Wednesday, December 16, 2009

Simple to make Christmas Decorations


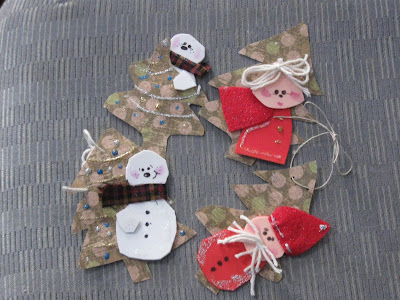
These are quite easy to make; you will need sheet of red and white craft foam, jute, hole punch, scraps of fabric, of your choice, black and red acrylic paint, small paint brush, glitter paints, the paper should be scrap book paper and it can be your choice of greens or of design that resembles colors of a Christmas tree. You will also need a hot glue gun with medium temp glue sticks white cotton yarn and scissors.
This can be fun by just cutting out the paper in a tree shape make these as small or big as you want mine are about 4-5 inches. Like I mentioned I just did this free hand with no patterns.
The jute is for stringing through the hole that you will make at the top the tree using the hole punch when you get th
is finished, just knot at tie a bow at the top. Cut out the foam also just free hand designing the shapes you would like then hot glue the foam to the trees that are cut out, then decorate as you would like. Before I forget.. I made the little checks, by just using red acrylic pain and doing a wash to get that light little pink cheeks look. I used a small amount of cotton white yarn for hair and facial hair, just cut a few small strips and tie together then hot glue to the faces. Do the same for making the little scarfs and hat, cloak.
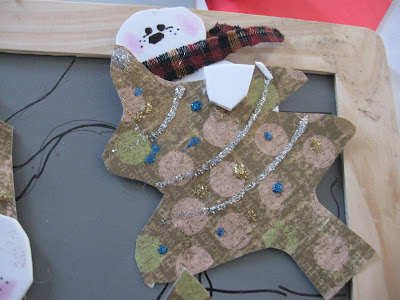


This is very simple and inexpensive and you can make quite a few ornaments for a tree because some these items you may have already and it is a way to get family together to help out making these for the holidays and your tree will look great so have lots of fun with this simple idea and make it your own.


Sunday, December 13, 2009

Crafting Away I Go


Season Greetings to all!
Well I was seriously bitten by the crafting bug this week; you may remember that photo I had posted of the start for a doll head, well this week I began working on it seriously and these are the photos of the progress that I have made.
I am painting with acrylic paints and the doll is made with news paper hodgepodge and a balloon. As I mentio
ned a few weeks back this is my first attempt at doing a doll this way, so far not too bad, she is coming out pretty good.

This is a photo with the head completely painted with the acrylic paints and the hair is now hot glued to the head, now I must begin working on the body of the doll which will be filled with fiber fill and will be my own original idea, the head is my own idea no pictures or anything that was used to make the face of the doll just thoughts in my head. I have also filled the head with fiber fill just for added security and firmness to the head, she will be a kind of keepsake doll not one to really be able to romp and play with but one than can fill a person full of memories. I will keep everyone updated as I finish the doll and this coming Wend I will have a cute idea on making ornaments for the tree, and it will be using just craft foam, book scraping paper glue and jute.

T

Saturday, November 28, 2009

Big Sale and Free Shipping Plus a New Project


Hey all! I hope your Thanksgiving was fantastic; today is going to be brief I wanted you all to know about the sale going on in my Art Fire store, there is 40% off until the 30th and also free shipping which I will have until the end of December. So I hope you all will venture into the store and take a peek at my sale and free shipping.

I am also working on a few things, a new doll using glue, water, balloons, and newspaper, yup that's the head of the doll in the photo.
I am also working a different kind of crochet rag rug using yarn and jute when I get it finished I will post photos of it here shortly.

Tuesday, November 24, 2009

Happy Thanksgiving to All

I just wanted to wish all friends and families a very happy Thanksgiving and mention what I am most thankful for, and that would be my trials and adverse times.
Why? Well I am hoping that those things will help me to be a better person, I hope that I have gained more compassion through my adverse time of losing my home in Nov 2, 199 I do know what is to lose everything thing, but not everything, I may have lost the material things but I do know Heavenly Father and my Lord Christ made sure my son who was 5 years old at the time got out on his own and knew what door to go out, I believe my Heavenly father guided him; as later one fireman would tell me "It sure was a good thing he chose the front door". I am thankful for the firemen who risked their lives to put out the fire, and for those who donated so much to us, thank you, even now just does not seem enough. I am thankful that Heavenly Father humbled me enough to find my way home to the LDS Church.

I am so very thankful so the next trial, it brought a special closeness to my husband who was hit head on in his log truck, not only am Ithankful he lived through it but I am thankful he was there, I know Heavenly Father meant him to be there at that moment so that he might take the blow and save those that were behind him as others expressed to him.

In these past few months I have been given another trial and it has been quite adverse in testing my faith and courage and yet helping to cast out the rocks and be forgiving to those that did my daughter harm.

Most of all I am thankful that I have a Heavenly Father, and my Lord Christ and that I have been given the trial and adverse times, but also the ability to pray for guidance and faith to know it will all be alright.

All are in my prayers that you are blessed and have a Happy Thanksgiving.

Sunday, November 15, 2009

Apple Cider Pancakes and Edible Craft Idea


I thought is would be a really different delight at breakfast time with the holiday season fast approaching and it is really very simple.

What you will need is dry pancake mix and dry powdered apple cider packets about 3 of them will do; you choice of apple peeled and sliced into small chunks.

Mix up the pancake batter as the directions indicate then add the packets of apple cider, or if you have a jug of apple juice, apple cider sub it for the milk or water that the pancake mix asks for to make the batter.
Serve this will hot maple syrup and bacon it is yum! and the pancakes really seem to fluff right up using the packets of apple cider.

This craft project is also pretty quick and easy, that I thought up!


What you will need is two large packets of the sugar cookie mix, or make the cookies from one of your own sugar cookie recipes, or a box of sugar cookie mix.
Make up the cookie batter for cutting out shapes because you will need the flour spread out on a cutting board, I used about 2 table spoons of flour.
When you get your batter all done roll small smooth balls on the floured cutting board about 1 inch balls.
Roll the balls in sugar and cinnamon or color the sugar with a dab of green, red food coloring; place the balls onto a lightly greased cookie sheet, now take a smooth small cup or glass and dip it into the sugar mixture and flatten out the cookies carefully, bake till lightly browned and just before they cool make a small hole at the top. String fishing line or a heavy thread through the cookies and ribbon of your choice.
The idea of these is to make edible Christmas ornaments for the tree or to give as a gift for a neighbor or friend. Plus if you have kids around these are fun to make them with and they will not hang on the Christmas tree for long, this is very simple treat/gift idea and you can change and make the creative side of you flow out.

Thursday, November 5, 2009

Homemade Chicken Pot Pie in an Black Iron Frying Pan


Yes it is another recipe to share with everyone!
I love cooking although I don't cook with a science in hand, instead I like to throw things into the pot and see how it comes out; in other words I love cooking by taste only, and I sharing with the idea you can can make this your own in in what ever way you wish.
Well we are getting the first really bad storm of the reason, winds will be blowing a 60 miles an hour and just sitting here writing this; I can tell you its blowing now.
My son picked potatoes with his girlfriend and he brought me a 100 potatoes and I am putting them to good use, and this is what the recipe is about those potatoes.
What you will need:
2-3 large potatoes all cut and cubed
I like to use caned meat and either beef or turkey will work or you can cute boneless chicken and cook a little before hand and then add it to the rest of this recipe.
small whole carrots/baby carrots don't cut them about 2 cups or 1 1/2
broccoli just about 1 1/2 cup and just break up the broccoli
can of mushrooms
one packet of chicken gravy
1 can of mushroom soup
1 red onion chopped cup
corn bread mix
Okay add your canned meat at least 2 cans in large skillet, don't drain the meat just dump the juice into the well greased frying pan. Add the mushroom soup, gravy mix, carrots, onion, broccoli and potatoes that are cubed, now mix really well in the frying pan and if it looks as though its all clumping together and too thick add about a 1/4 cup of water and mix again. Smooth it all out through out the frying pan.
Now follow the instructions for making the corn bread and pour the uncooked corn bread dough over the top. This is going to be a heavy frying pan so put a cookie sheet under before adding everything I should have stated that sooner, place the cooking sheet with the frying pan on top into the oven and bake for 30-40 min. or until it starts turning golden brown on top and tooth pick comes out clean, this is huge meal for a large family of about 5-6; we always have left overs, serve with a nice salad and hot apple cider.

Monday, November 2, 2009

A Recipe for Cranberry raisin Walnut Cookies


I love these Walnut Cranberry raisin cookies; these are very easy to make with just a white cake mix and it does not matter what brand just any will do. If you use Jiffy I suggest buying about four boxes being that the boxes are small.
Add you cake mix to a bowl and one egg and one cup of soften butter do not use margin, butter really makes these cookies taste mouthwatering good.
Now add a table spoon of water and just about two cups of cranberry raisins, the walnuts should not be chopped up into small pieces rather just cut and chopped slightly. Finally add about one and one half cup of white chocolate chips, mix all together and drop spoon out about a table spoon onto a well greased cookie sheet, bake at 350 until cookies look done and slightly browned serve warm, these will not last long. I can get up to 45 cookies using the cake mix and for me that is a good deal with that teen boy.

Friday, October 30, 2009

Quick Witch Hats for Halloween


Well I finally started these and wanted to share them with you, they are not quite finished but you can do this recipe very quickly and add what ever color frosting you would like to these witch hats.
This year I went with the striped kisses just because I thought they looked pretty cool.
What you will need is Keebler short bread cookies that one can find easily in the store, I would buy several containers, depending on family size ; in my family these go super fast.
Then get a bag of chocolate kisses or the stripped ones and some chocolate frosting and a tube of the green, orange frosting for making the bows.
When you get home just flip the cooki
es over and and spread a small amount of chocolate frosting around the hole of the cookie, because you want the kiss to stick to the top.
Now take the tube frosting of either orange or green and draw a small line around the bottom where the kiss meets the cookie and then draw 2 small loops and then a dab of green in the center of the loops as to indicate a knot, do this with all the cookies and kisses, you can even mix it up with the stripes and just straight chocolate kisses, it is a very simple and quick idea for the last minute Halloween treat.


I have added the frosting just not the bows to these pictures, thought everyone could just use imagination and the bow is very simple to do and looks great not matter what. Sorry everyone that's hole not whole and just dab a bit of chocolate frosting around the hole then at the base of the kiss add the orange or green frosting in these photos I have not done that.

Tuesday, October 27, 2009

An Adventure with the Talking Tombstones


I just love this event held in Astoria Oregon every year right before Halloween night!
This year I was able to video tape some it and yes you see that some of it is side ways that because I got better angle but I can't seem to figure out how to turn the video with this new computer.
This first gentleman was a lawyer for the district and was shot by his rival. Remember that these are true life stories of actual people who once lived here and not made up so it really it neat how the historical society finds out about each person and then portrays them.
One really interesting bit of history was that the Chinese were buried in this cemetery and then later dug up and taken back home to china.


I wanted to video a one of the head stones just to give everyone idea how old this cemetery is and I got a bit of the hubby in it. What is so interesting is that you learn what life was like way back when and how hard things were, such as dying of consumption. The next story really was very sad a young lady of the times caught up in becoming a woman of the evening and given false promises and then ending her life; when the deceitful man went off and married someone else, she used Morphia and was buried without a headstone I thought this tale was sad.


This last gentle was very interesting, seems the papers way back when stated that he drowned in the item he is popping out of and that he was intoxicated at the time but the gentle states that he was not. His mother did sewing and mending socks, but that's not what she did really, seems she had a house where the men folk liked to visit all the ladies who mended socks. His mother left him in Astoria at a young age and later he worked in the Canneries, he would pull Salmon up with this great pole with a hook on it and often this item was used to fight with loggers, the day was so interesting and just perfect for a visit to the talking tombstones.


Saturday, October 24, 2009

Its Time to get Spooky


Well I have been having lots of fun I decorated the yard in an old grave like manner and yesterday I when and enter a witch contest locally here in Astoria Oregon and was it lots ghoulish fun. There were some wonderful witch costumes and I will share some of the pictures that my husband took of me all dressed up and a picture of the pumpkin my son craved.
The contest was held at the Country Crafters store; what a wonderful store, filled with all kinds of goodies, I personally bought some neat scented candles and some orange hot chocolate, and is it good with warmed milk.
The pumpkin is from some wonderful friends and is about 100 pounds I would guess. Mitchell scooped out all the inside and I toasted the pumpkin seeds in celery salt and they sure did taste good.
I dressed up as the evil green witch from the coast and my top is stuffed with fiber fill in case anyone might wonder. I was so excited to fit in the green dress I have been really working hard to lose some weight and I have lost about nine pounds I still have a long road ahead.

Friday, October 16, 2009

Hello Again... It's been a long time.

Hey everyone, it has been a very long time since I have posted... let me say I am very sorry.
But I facing a very serious trial, one that is going to take some time I can not say much because I do not want to hurt the investigation that is going on.
But I can say this trial has shaken me very much...but I still have faith in that it will turn out.
It will not turn the way my daughter wants or I want but maybe just maybe... in the end it will turn out, maybe just writing this will help others.
I have seen the ugly side of technology used for what is know as sex texting, I have say those who do this should be ashamed.
I hope and pray someday there will be laws that will protect against this. Laws that protect kids that are not able to understand fully what an awful thing this is; sex texting. The thing of it is this was not teens who did this to my daughter but grown men, men that should know better, you would think. This is only part of what is going on and I have said too much now. I am sorry for writing this because it does seem possible it could happen to a parent with an daughter of Autism and yet looks grown up.
I will try hard to get some crafting ideas to everyone, but I have to be honest my heart just has not been in lately.
Please pray for my daughter...

Wednesday, September 2, 2009

A Crazy Time and a Cute Craft Project Idea


Hey everyone its been a couple of weeks; well it's been extremely crazy for me.
I have been like a chicken with my head cut off, things are just so different not having my hubby around all the time. He is gone for five days of the week and get to see him for such a short time on weekends.
To make things worse I fell off a
ladder and hurt my ankle and foot so I have been laid up.
My son is going to a different school and I have been very busy trying to get ready for that along with moving my daughter out into her apartment, in other words things have been quite frantic around my house.
Today is the first day I have been able really to be on my computer and I thought I would share this cute Idea.
What you will need:
prefabricated wooden toy that can be found
at craft stores. Any item will do I am just using this one for an example.
First stain the item with a very dark stain, I used just black acrylic pain and painted onto the wooden item and then wiped off with a paper towel.
Next let it dry for a day or two; then paint using some type of crackle to age the wood and let it sit for a day or more again.
Next paint certain items that you might like painted but once wipe off and more paint then wipe again as I did with the little bow in the hair and the hair, so that it looks faded.
Now paint your facial features anyway you would like, I just did some simple eyes in black and the mouth in black acrylic paint.
To add the paper products:
Take your favorite colors of paper, a heavy duty paper I would suggest.
Now for the dress I just paper and laid it on top of the wooden toy and pressed where I wanted to cute the dress out; then cut it out and glue it on and do this with the legs or where ever you want on your wooden toy.
Let dry for another day and add more of your dark stain and wipe off with a paper towel, dry again and now use a good brush on sealer, in this case I used a semi-gloss sealer and let dry for a few days.
The idea is to have fun with just a simple and easy idea and past a few hours of the day away doing it.

Monday, August 24, 2009

My High Flying Boy


What an exciting Saturday for my son, who is almost 16 years of age and trying to get his pilots license.
There was a small open house at the Coast Guard Air Station and the Astoria airport.
Most of the morning was getting to ride
along in some cool looking air craft and this is one of the photos of him outside the 1948 plane.


This was the second play a Russian Yak military training plane for the Military and is no longer made, making them was stopped in 2003. He really loved flying along in this one, it was fast and quite fun for him. He also got to fly along in two other planes that I forgot to take pictures of, he got to experience barrel rolls and dives. If it would have been me all one would hear is a blood screaming woman from the aircraft. I almost think he will be flying sooner than driving. It is his dream to fly in the military one day, and knowing him, he will alright, and yes I am very proud mom of my fly boy.

Friday, August 21, 2009

Fall Time Applique Place mats


I created these four place mats just using some left over fabrics I had; such as the rayon cotton plaid fabric it was perfect for the back round, some wonderful scraps of fall time farming fabric and a nice thick cotton fabric for backing.
Each place mat has a bit of a different scene on it, and I whack out the scenes and sewed them on using my sewing machine.
These were pretty simple and fun to make and I just love whacking fabric out and finding out what one can come up with, I did not use any batting just because the backing was nice and heavy and it seemed like these just did not need the centering. I plan to add them to my art fire store at http://49stocker.artfire.com
So I hope you will come visit and find other wonderful items in my store.

Monday, August 10, 2009

A Tastey Shrimp Dinner That's Quick to Make


This is one of my favorites to make for my family; it's really quick to make.
What you will need:
1 large bag of frozen uncooked shrimp
celery salt
2-3 cups of real butter
zucchini cut up
yellow onion cut up
vegetables can be added to this what I like is carrots, pea pods, fresh frozen peas, green beans, celery or without like the picture.
White Instant rice.
First add the butter to a large frying pan, onion, celery salt, pepper, when the butter is all melted add your veggies such as the zucchini as in the picture cook till veggies are almost tender now add the shrimp and begin cooking the instant rice or minute rice, cook the shrimp until a nice pink color.
Now dish the shrimp and veggies over the rice using a large soup ladle as to also get the seasoned butter sauce to drizzle over the rice also.
You can also use garlic salt or a season salt what ever way tastes good this recipe has lots of variety and is very quick and easy so make it your own, I do suggest sticking with the butter it makes it say much better.

Wednesday, August 5, 2009

How to Make this Silly Aged Butterfly


I did this butterfly just out of silly thinking and dreaming of what I thought an aged butterfly should look like. There was no patters used for this just some free hand drawing
First I used muslin for the body of the butterfly and stained it with a washed out black and browns and a touch of red. I baked it in my oven at 200 degrees until it was dry.

Next with a sewing pencil or washable marker I drew out a bit of a bone shape making one end of the bone shape larger because this will be the head of the butterfly. I cut out 2 pieces and sewed the eyes on and painted the nose on with acrylic paints and let that dry for a day. Then I sewed all around the body making a small slit in the back for adding the fiber fill.

I found some wonderful fabric that was a mixture of cotton and acrylic fabric, and I just drew out the shape of the wings onto the fabric using a white sewing pencil and then I cut out the wings and stained them with a brown walnut stain and once again baked the fabric at 200 degrees. I better mention I cut out 2 sets of wings and sewed them together being sure to leave an opening to turn the fabric.
I then gathered the wings in the center with a running stitch and sewed them to the back of the butterfly covering up the slit in the back.
Finally I used a bit of fishing line for the top of the butterfly by just sewing the line through the fabric and knotting.

Tuesday, August 4, 2009

Life is always Full of Change


Life can be so interesting sometimes, full of changes; well its another big change for me and my husband. I think this year was the most we have ever struggled due to the tough economy. So it was time for a change....
What a big change my husband gave up the mule train log truck and is now training to be a tanker truck driver, it is huge change because it means him having to be away from home for while until we can sell our home and move closer to the new work.
It has been tough to make this choice but I know Heavenly Father has been guiding us along the way and for me it means lots more prayers to keep my husband safe because if I thought driving the log truck was dangerous now he will be driving around in a large gas can as we joke about this, so we still have a sense of humor.
Leaving the log truck behind was hard because he enjoyed it, seeing some beautiful country side and he has done it for more than 12 years.
So this is the last picture of the mule train fully loaded and our home at this time.
Next year the home will have to be sold the job location is to far away and we need to be closer.

Thursday, July 30, 2009

A Summer nap and Catch for the Day, whacked out pillow


This is one of the very first pillows I ever whacked out, and what do I mean by whacked out?
Well its a form of cutting out fabric to design a scene, such as this one, I cut out each piece of fabric and placed it onto the cut out size of muslin then sometimes I will use a stick glue; just a dab and some e
embroidery thread that is not knotted and sew a few stitches through to hold the cut out pieces of fabric in place.

Then I will sew the fabric into place by using a selected stitch on my sewing machine; in this case I used the blanket stitch. I often just cut out my pieces free hand because you can get some interesting cut out pieces of fabric.

After I have sewn the the front of the pillow then I look for fabric for backing and fill the pillow with fiber fill, sometimes before I back I will add buttons or other items and sew them on by hand to just give the
pillow, a creative look as I put it.

In the case of this pillow its all about a little boy who seeks adventure so leaves his town to the near by lake to catch that glorious catch of the day, but falls asleep due to the wonderful, peaceful summer day.

I will be adding the pillow to my art fire store in a few days so be sure to look for it there to purchase.


Monday, July 27, 2009

A Recipe from 1927, Peanut Butter Bread


This is from one of my favorite cook books called Forgotten Recipes by Jane Rodack.
I just love these recipes and tips they are easy to do and taste great.
This recipe is from 1927, and is so great alone or wi
th some honey spread on it.
What you will need:
2 cups of flour
4 teaspoons of baking powder
1 teaspoon of salt
1/2 sugar
1/2 peanut butter ( in my case I used crunchy peanut butter; it was good)

1 1/2 cups of milk
Mix the first four items, then add the peanut butter. Make sure this gets mixed well, now add your milk and beat again, and pour into well greased large bread pan or 2 small bread pans because this can make one large loaf or 2 small loafs. Bake at 350 for an hour or until tooth pick comes out clean.

An old time hint: did you know you can make color frosting from jelly beans? Its true just dissolve them in a bit of warm water.

Tuesday, July 21, 2009

Brown Sugar Brownies


These are just yum when served warm; I love to make these anytime and the recipe is not that hard to do for a sweet homemade treat.
What you will need:
2 eggs
2 cups of brown sugar
1tsp. of baking powder
1 1/2 cups of flour
1/2 cup of melted butter
Mix all the ingredients and spread into well greased 8x8 baking dish. Bake at 350 until done, by sticking tooth pick in and it comes out clean.
These will go fast!

Friday, July 17, 2009

Working on new Halloween Quilt, a painted wall hanging quilt


This is the Halloween quilt I am working on; is painting with acrylics onto muslin with Halloween cotton fabrics around it.
This is a picture of how it is going so far, the picture is of a Kitty looking back into the window of his home with a creepy pal spider.
I am using a wash of colors for the back round so that you get the idea its dust and I have cut out my blocks that will go around the picture of the cat.
I will seal the acrylic paints but it probably still will not work to wash this quilt in a washing machine.


These are photos of close ups of the cat and the spider so far, I have really enjoyed working with the acrylic paints on the muslin.

Wednesday, July 15, 2009

Crafting Frenzy Wendnesday


I just finished another set of crochet baskets; the black one is a mini and the larger one is small but larger that the mini basket. I used my 10 1/2 hook to make both these baskets, and no pattern just idea out of my head. I did a triple stitch and a double with a single to give each basket some height.


Then I decided to make another jewelry box; this one will also look aged I am now in the process of decoupaging it right now and will use some acrylic paint to stain and and a touch of walnut stain.
Would you also believe I am also working on another crochet/braided rag rug this time I am using a 6/6 hook and it will be a large rug; plus I am working on a Halloween quilt, that will be a walling hanging quilt but I want to save those for next week and it is a bit different quilt to stayed tuned for those upcoming projects.


Saturday, July 11, 2009

Engilsh Muffin French Toast


A good way to make a change in french toast, this is really very simple just purchase English muffins do this type of french toast. Next mix 2 cups of milk, 2 eggs, 1/2 table spoon of sugar, 1 teaspoon of cinnamon, 1 teaspoon of vanilla.
Beat with a fork or a very low speed with a mixer, dip the English muffin into the batter and add to a well or sprayed frying pan, cook on Med-high heat, careful not to burn them flip after a few seconds so that the tops look golden brown and golden brown on bottoms.
Serve with warmed maple syrup or fresh fruit, and you can make these really low fat by omitting the sugar and using an egg substitute and just warming up some fresh fruit in a sauce pan, such as strawberries.

Wednesday, July 8, 2009

A Chalkboard Acrylic painting to Celebrate Summer


These small wall hanging painted chalk boards are my very own creation; I came up with the idea of painting chalk boards.
I like using acrylic paints and using the whole chalkboard to create the scene and then I seal these chalkboards with a good sealer, sometimes a flat or glossy sealer.
This one is a small wall hanging of a happy little frog singing about the summer days that lay ahead.
What I do is take a piece of transfer paper and transfer the drawing onto the chalkboard by rubbing it onto the chalkboard, and just painting with the acrylics. I will be adding this little wall hanging to my artfire store at
http://49stocker.artfire.com There you can purchase this item.

Monday, July 6, 2009

Wonderful 4th of July


Hi everyone, I all had a wonderful 4th of July and I hope you all did also. We live on the coast and decided to go south and see family, when we came home it was later fireworks on the beach had just ended and everyone was leaving. It was hot inland so of course all headed to the coast I would guess maybe 200,000 people down on the coast.
I caught some video of the slow moving traffic headed off the coast back to Portland, Washington and lots of other places.
It took several hours for traffic to clear, but it also came to a dead halt for a number of hours also, lots of cars over heating both up and headed home.

Tuesday, June 30, 2009

Rock Painting, Turning a rock into a Cottage


I love rock hunting so that I can do up these cute cottages; so I go hunting for that special looking rock and bring home.
Then bring the rocks home and give them a good cleaning by using soap, hot water and a good scrub brush.


Acrylic paint and some brushes work great to help create these, also I use a very fine brush for my spider webs.
I just paint an out line on to the rock where I windows, animals, brush and begin filling in the details.
I also use an old ice tray for mixing my colors and a little water. I will go over the rock a few times, because sometimes some colors will just fade into the rock and there are other colors that will not fade.
Then I seal the rocks will a brush on sealer after the rocks dries really well with the paint.
I love doing these because you can find some real interesting rocks and with a little imagination they become a cottage.

Friday, June 26, 2009

New Way to Eat Scrambled Eggs


I found a new way to eat scrambled eggs and make scramble egg sandwiches so you can do this for a lunch or for breakfast.
This will take a little prep time but not much, toss some potatoes in the over and bake them until done or half way done. I usually put in 9-10 potatoes being that I have 2 hungry males most of the time.
When the potatoes are done let them cool down by either sitting over night or placing in the refrigerator.
In a large frying, put in 3 tablespoons of butter melt the butter and begin adding cut up baked potatoes, begin cooking them to where they look a bit golden brown. Now add eggs, I add about 5 eggs but you can experiment and reduce this recipe to how you like it. Begin stirring and scrambling potatoes and eggs, coating the potatoes with egg.
Now if you have lunch meat , left over sausage, bacon or any other kind of meat you can add or just leave meatless.
As eggs and potatoes begin to look done add salt pepper, seasoning salt, onion, shredded cheeses, sometimes I love to add pepper jack and make this spicy, but cheddar or any kind of cheese will work. Add the cheese last as just to melt over the top. Now its ready to serve up and eat.

If you would like this as a lunch do as stated above, omitting the cheese. then toast whole wheat bread, sour dough or just regular white. Add slice tomato, lettuce, a slice of American cheese, spread mayo onto toasted bread and then add scrambled egg mixture and you have a wonder and filling sandwich.
Both ways are good anytime of the day.

Wednesday, June 24, 2009

The Finished Crochet Rag Rug and Small Basket


I finally finished the rug and basket, they both were fun to create. Nope no patterns once again just ideas out of my head.
On the rug I used a triple stitch and a double, and I used a yarn that was acrylic and of many earthly tones.
The rug is about 19x18 and the basket is 11 inches across and
I designed a simple lid for it Now for the basket I did a single stitch and a double, for both the rug and basket I used my 10 1/2 hook and I also starched the basket somewhat so that it would be slightly stiff. I almost forgot; on the rug once again I doubled the yarn for that thickness and it worked quite well.


This project took a few more days, well about a entire week to complete this time, and lots of fun complete them.

Sunday, June 21, 2009

No Winners

Well no one posted any comments! Darn, so there was no giveaway but maybe next time and later I will show what I did with the doll.

Here is a fun way to do pineapple upside down cake; use a yellow cake mix and a can of pineapple chunks, pour chunks and juice all into mix beat well with mixer on high speed then add 3 eggs and beat again at high speed. Pour batter into large, well greased bread pan. Now melt a 1/2 cup of butter and mix 2 cups of brown sugar, mix until butter and sugar are crumbly and then sprinkle over top of cake mixture in pan, bake at 350 until golden brown and tooth pick comes out clean.

Thursday, June 11, 2009

Working on a New Rag Cloth Doll


Working on another rag cloth doll, this one is from a vintage pattern and I am doing her a little different. The design of the facial features is my own, the pattern actually called for no facial features nor no hair but I just thought I would see how she looked with hair and embroidery facial features.
Now my thoughts are should I leave her this way?
should I stain her and make her look really old?
So let's have some fun !
Give me your comments on what you think I should do next and the one with the wildest or silliest comment will win this.......


I will post the winner of the best answer on the blog June 20th once you see your name or the wining comment send me your mailing address and I will mail off the prize. Send to stockerpam@gmail.com
Be sure to add your mailing address and I will send priority mail to those in the United States, outside the United states it will be regular postal service.

Sunday, June 7, 2009

Graduation in Astoria Oregon


A quick shot of the cake!


Talking will my daughter and the thoughts she has but she was just so nervous about getting to the school, although she did mention what she wanted to be in a year or two.
This is the grandparents arriving at my home, this is my mom and I just had to video to bug her a little.


This was after the ceremony; we arrived at bit later to the ceremony and were way, way far in the back so filming was near impossible but we did get pictures but those will not be here. I got some really cute video of her afterwards anyway.


This is my dad; grandpa!


My wonderful husband and son and a bit of goofing.

Saturday, June 6, 2009

Honoring D-Day


Remembering the great importance of today, and honoring those brave who fought and fight for freedom
Thank you
I love all my family who were apart of D- Day you are always in my thoughts and heart.

Tuesday, June 2, 2009

Little Red Jewelry Box


This is one of those cute wooden jewelry boxes that look like a purse; I think these are lots of fun to design.
What I did first was to mix a bit of red acrylic paint and a bit of burnt umber and then I took an old cloth and began applying the pain and wiping off the paint as to create that washed out, old or aged look.

Then I let the jewelry dry for about 2 days as to make sure the paint was completely dry; before adding the stickers of flowers and birds. Then I let that sit for a day before applying sealer and I would add just a single coat and let that dry then another coat, so about 2 coats of sealer and I used a flat sealer so that it did not look that shiny.
I also stained the inside of box and and added more stickers, and applied only a very light coat of sealer.


This was a fun project to do and it will make a nice gift for a friend, or a family member.